Citizens is my largest project to date, so this page may be a little longer than the others. I’ll try and keep things organised!
Citizens is a game in which the player doesn’t necessarily play. The idea is to simply observe, watching a world of NPCs simply existing and living their daily lives. It was built to be a backdrop for simple games which might require such a living world. In its current iteration, it consists of a procedurally generated city, populated by simple AI pedestrian and vehicle agents. The game itself was inspired by the film “Free Guy (2021)”, and achieved a final grade of 84/100. There was also an element of research included in the project which I won’t post about here, but can be viewed in my final report linked at the end!
Contents
- General Overview & The Loading System
- World Generation
- Agent Prepwork & Generation
- Agent Navigation
- Living World
- Links
General Overview & The Loading System
So, as above the game is designed to be an observable universe. Part of the challenge I had set myself though was that I didn’t want to know the “map”, so I couldn’t cheat and pre-program any routes. As such, I decided to take the approach to randomly generate a map of pre-defined size each time the simulation is ran. It’s assumed that all the citizens of this world know their home and can safely navigate without needing to explore just to avoid pure chaos!
What this meant was I effectively needed to design a system where entirely in one Unity scene, I can have multiple stages – a few preparation stages, then a “gameplay” stage. To achieve this, I implemented a state machine to act as a loading manager, handling a total of 11 different states of loading progress, which could be grouped together into different parts of the loading system.
The game begins with InitializeLoadState, which initializes all the prefabs and data we will use, and make sure our registries are populated. The game world itself is made up of a tile and chunk system; 16×16 tiles form one chunk, and each tile is in effect one simple building or road piece. These tiles have unique IDs which are all registered, and a root clone of the prefab is generated during this stage to avoid performance hiccups later.
After this, we move into World Generation, which includes generating chunks (GenChunksLoadState), generating roads (GenRoadsLoadState), and generating buildings (GenBuildingsLoadState). After these stages are finished we effectively have a generated world, and can move into the agent prepwork phase. This consists of generating agent navmeshes (GenNavMeshLoadState), and populating runtime registries (PopulateRegistryLoadState) – which handles the address or location of buildings that now exist in the world. Finally, we can populate our world with agents (GenVehicleLoadState and GenPedestrianLoadState), and we are ready. The final two states are very simple – MoveCameraState which simply animates the camera from looking at the sky to a view over the city, and CompleteLoadState which can tell any future checks that loading has been completed.
A lot happens during the loading phase, so I’ll cover the three core areas in more detail below.
World Generation
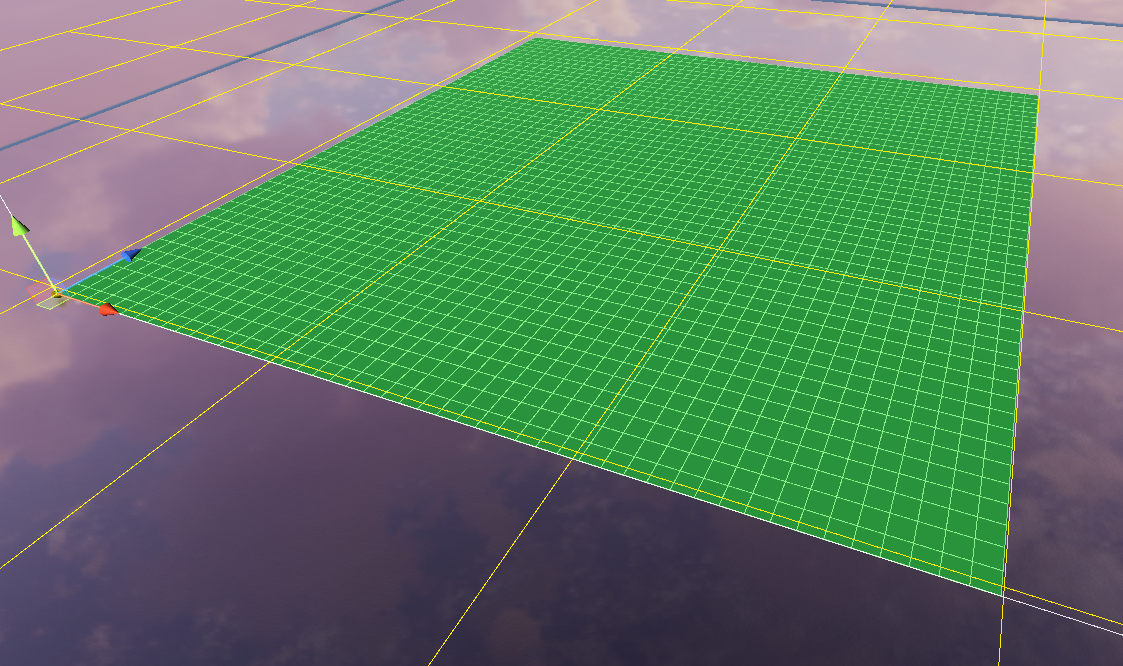
The world generation and aspects of the project’s organisation take inspiration from my work with modding Minecraft. Citizens is a 3D game, but for all intents and purposes the world can be considered 2D; consisting of a grid in which each space can contain one “tile”. Tiles are prefabs which are registered into the game and are all uniform in size, and could be something like a small building or a segment of road. The world is divided into chunks, inspired by Minecraft’s system, which are 16×16 tiles each. This allows for more sensible organisation as well as future improvements to world saving, loading, editing and performance improvements. Internally, a prefab chunk consisting of grass tiles is utilised as a base for the world to speed up generation, with one being instantiated to each chunk position for the initial world size. Here’s an image showing a 3×3 world; the yellow Gizmo lines are marking chunk boundaries:
The first stage of world generation is to create an empty world of grass tiles – just like the one shown above. This gives a nice blank canvas to work with, where any space that isn’t edited will remain as grass. These chunks are generated a few units above a large water plane, giving the world a square island feel.
The next state after the initial chunk generation introduces a simple road network to the world. This utilities a diminishing algorithm, where each road has a certain chance to create a junction and spawn a new road, and each new road spawned has half the chance of the previous road. This gives an overall good starting point – this gif shows road generation on a 3×3 world (A little slowed due to being a gif). Roads are modified later! After the core network is generated, a ring around the outside of the world is also added – this ensures all entries and exits are connected, and also provides a nice visual boundary as these edge roads have a wall descending into the water below.

After roads are generated, the game iterates through the map and detects all the areas of grass, and saves them as “sections”. These sections are then used in a number of generation passes. First, the game adds any essential buildings, such as the hospital and town hall, and creates roads around them. Next, it finds any areas which are deemed too large and subdivides them into smaller streets. Finally, it places any other smaller buildings and procedurally generated buildings. This is all shown in the next gif:
After everything is placed, we take a performance pass. In this part of loading, we find all objects of the same material (for example, a procedurally generated car park), and combine them to a single mesh. This drastically reduces the number of GameObjects being loaded in the world. Continuing with the car park as an example – it may take up a 10×3 area, and be four high, with a total of 120 GameObjects. Each GameObject in this situation also has its own MeshRenderer, which individually can start to eat away at performance. For the game world to work we still need each tile to have its own GameObject, but we can take all those MeshRenderers and combine them down to one (or a few) single objects. To do this, I iterate through all the meshes of the entire building, adding each to a list depending on its material. I then combine all meshes in the list down to a single object, and remove it from its original GameObject. We are now left with four or five GameObjects with MeshRenderers that render the entire car park, plus the data-only GameObjects with the tiledata for each part. Doing this across the entire map is possibly the single largest performance increase in the entire project.
We now have a fully built world, consisting of roads and buildings! It’s time to prepare the world for population. Here’s a quick video showing the entire generation process in real-time:
Agent Prepwork & Generation
This part of the games loading and generation effectively prepares our now visually-complete world for the agents who will live in it. The key stage of this is generation navigational meshes and objects.
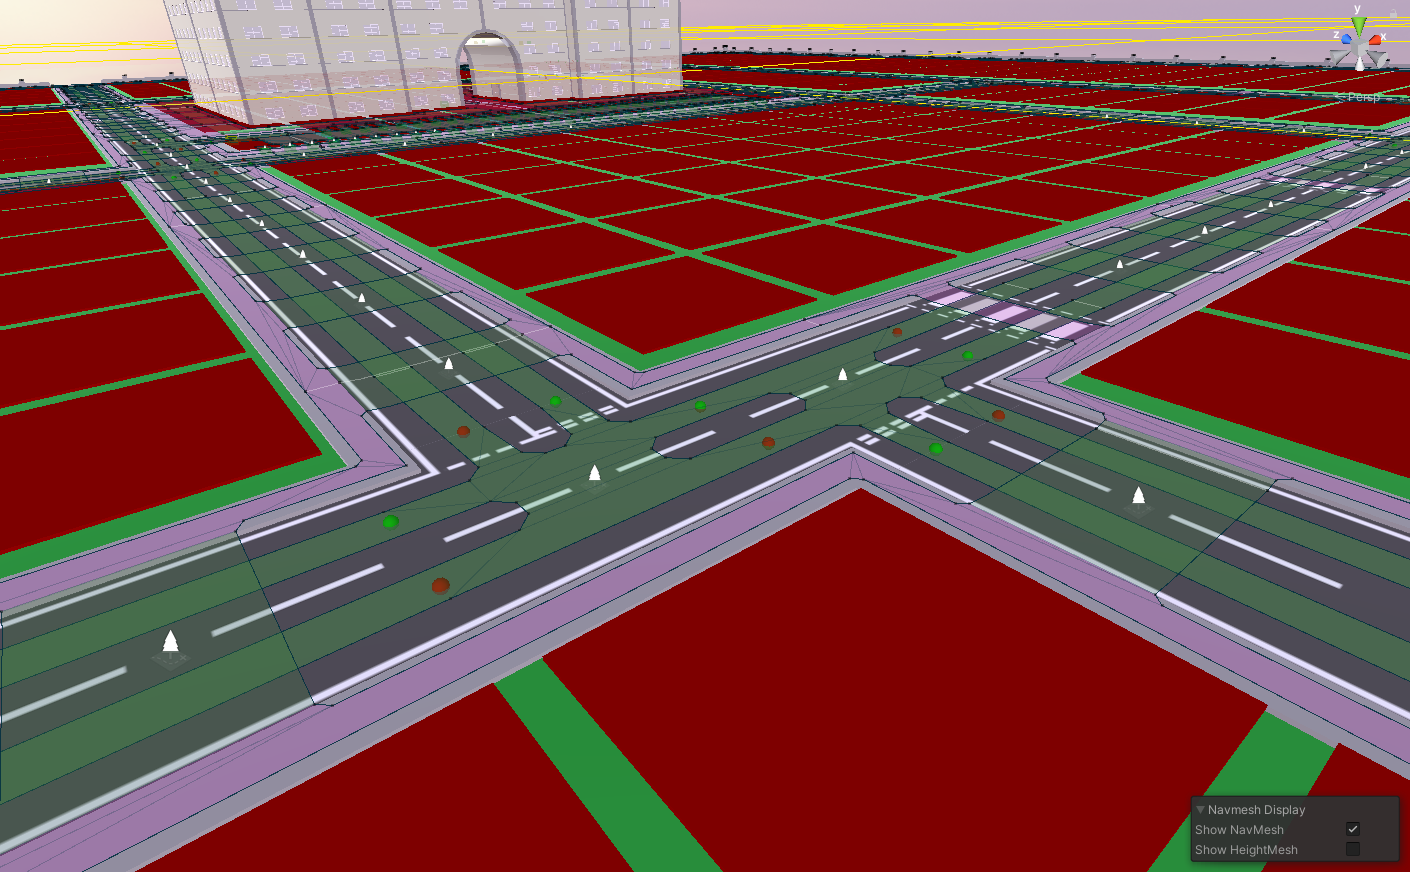
In effect, the Citizens world has three different base navigational systems working together. First, we have an overall A-star tile grid, aligned with our world tiles – this is used for vehicle agents to very quickly plan a general route across the world. After this, we have two Unity NavMeshes – one for vehicles, and one for pedestrians. The vehicle ones are baked purely onto roads, while the pedestrian ones can also enter some buildings like shops and houses. Here’s a world with buildings disabled to show these three navigation systems together – the red squares are the A-star grid, marking tiles which cannot be driven on through normal navigation. The green overlay is a more defined area of where a vehicle can drive – these would also be generated in car parks for example, and the purple is a preferred area for pedestrians to walk on. You may notice there’s also a pale green section crossing the roads – these are areas a pedestrian can cross a road, but they would prefer to use a purple crossing. More on this later!
After creating navigation areas, we finally have to populate our runtime registries. These are a collection of registries which keep track of locations for things such as shops, houses, and world exits. By having these registries, we can for example quickly decide that a spawning vehicle simply wants to cross the city and exit the world, so it will chose a random world exit from the list of world exits.
Now we have a world which visually exists, and has all the data required for an agent to explore – it’s time to add some life! Agent generation is very simple – the intial agents are simply placed on a random, sensible location of the world – vehicle agents are placed on a road that isn’t at a crossing or junction, pedestrian agents are placed on a sidewalk. Vehicle agents must also be facing the correct direction for travel! They are then applied all their randomly-generated data, both the useful (the destination, which it will generate a map to reach), and the fun (their name, job, etc).
Agent Navigation
There are two fundamental types of agents in the game; vehicles and pedestrians. Both of these at their core use Unity’s NavMesh system and a state machine to navigate, but beyond that work quite differently. Vehicles specifically are quite complex.
Vehicles utilise the secondary broader A-star mesh mentioned above alongside their Unity NavMesh. To achieve this, a vehicle first generates a general path from start to finish using the A-star mesh, and then creates smaller Unity NavMesh paths between a series of nodes. These paths are precalculated at spawn time and saved to a list, so that when a vehicle reaches the next node, it can immediately transition to the next path with no recalculation time. This image (below left) shows a very simple agent path – the vehicle spawned at the top, and passes through three node controllers before despawning in the bottom-right. The overall A-star path is highlighted in blue (red squares indicate an untraversable location)
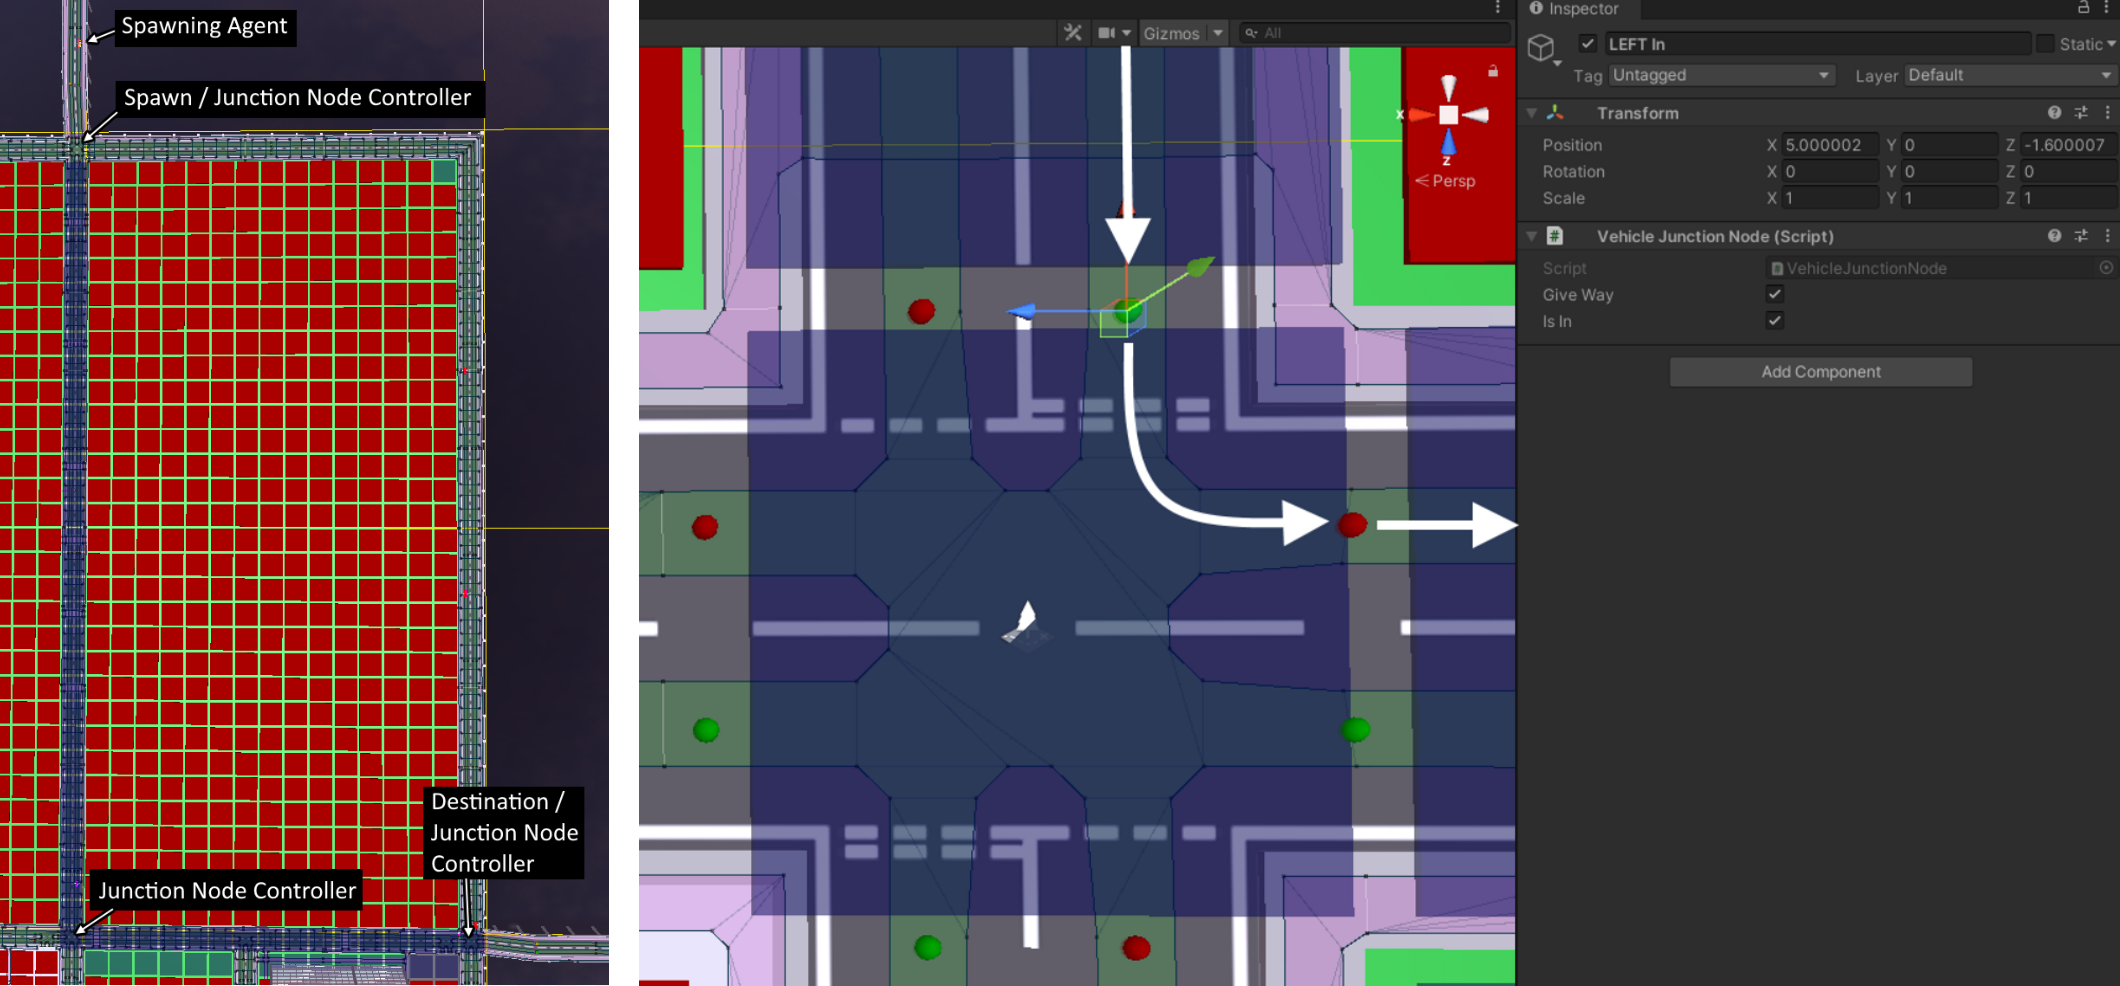
The other image (above right) is a close up of the junction node controller. Every junction node controller has input and output nodes for each available direction – in the case of this crossroad, all four directions. Nodes can be marked as give way, but generally the vehicle’s state machine dictates how a node would be handled. In this example, a vehicle approaches from the north and would stop at the give way node, checking both directions, then turning left (right from our perspective) to exit east. If for example a vehicle came in from the east and was turning left to go south, they would not need to stop, but would slow down to approach the turn. A vehicle crossing the east/west axis without turning wouldn’t even need to slow down, as they have right of way.
These junction nodes play a number of important functions; primarily allowing for stopping and general state management of vehicles, but they also provide a simple way to keep vehicles on the correct side of the road. Unity’s NavMesh system does not have any kind of directional control and an agent can move in any direction on a NavMesh, so this ensures the vehicle will always be driving on the left as it travels between the nodes.
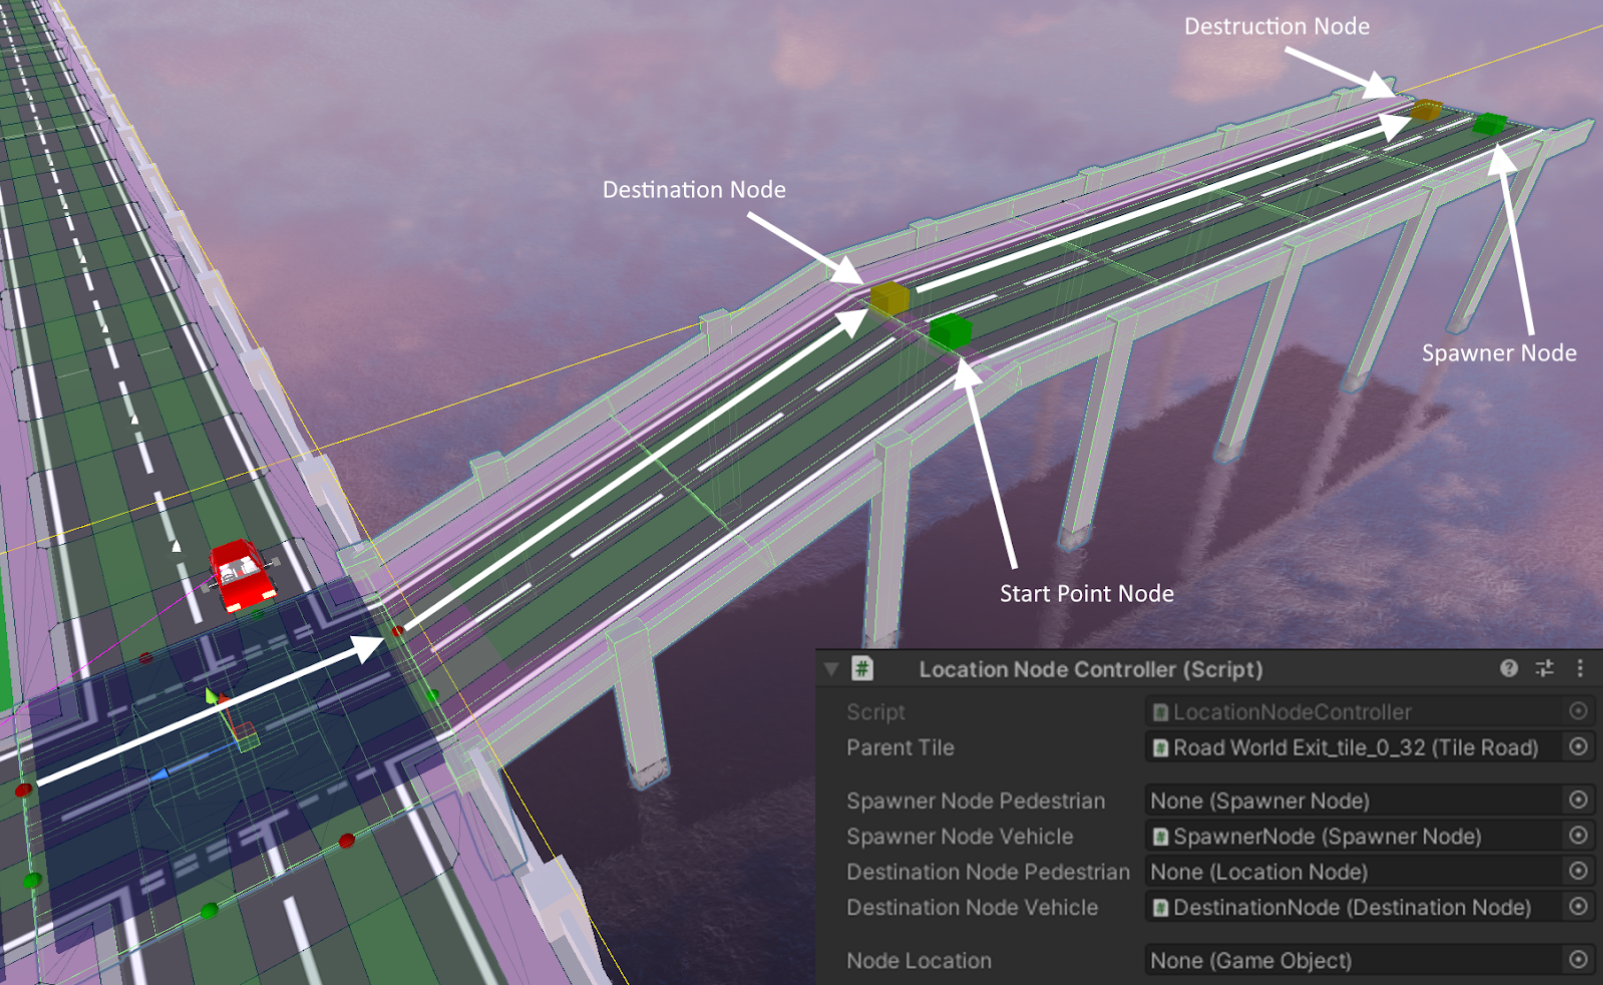
In addition to the junction nodes, there are also spawning and destination nodes. These again have a controller and often consist of two parts. The below image is from the same example as above; this is the final point where our vehicle will travel to before leaving the world. The vehicle first treats the junction node as normal, following the exit point towards the destination node. When approaching a destination node, the vehicle can perform a pre-check on what will happen next. A destination node can forward to another destination, immediately destroy the vehicle, forward the vehicle to a destruction point (which ideally would be out of sight of the player), or forward the vehicle to a parking space. In this case, the vehicle is forwarded to the end of the bridge where it’ll reach a destruction node – and upon reaching that, it is removed from the world.
Spawning works in a similar but simpler way; vehicles are spawned at a spawner node and then travel to a start point node. During this travel time, their destination is decided and the path is pre-calculated, meaning a vehicle can begin moving as soon as it enters the world and calculates its route while already travelling.
As mentioned above, vehicles themselves are controlled by a finite state machine. Vehicles will switch between around 12 states, controlling aspects such as waiting at a junction and checking if it’s clear to go, or waiting for another vehicle to move. When waiting for other vehicles, they also use a relatively simple fuzzy system to keep a reasonable distance and speed, emulating more realistic traffic where not every vehicle begins to move at once.
Below are a couple of videos showcasing these concepts. In the first video, a vehicle is spawned at a spawn point and travels across the world to a different destruction point. In the second, a vehicle which was pre-generated into the world travels to the hospital,
(please note small buildings are disabled in this video for visibility reasons)
Pedestrians overall work in a similar fashion. They utilise spawning and despawning nodes in the same way (albeit in different locations), and their objective is to navigate to a few shops before going to a house. One unique functionality to pedestrian agents is crossing a road. When an agent needs to cross a road, they will first check if there’s any crossings in the area – if so, they will prioritise these over crossing anywhere else, as they are considered safer. Once they’ve decided where to cross, they’ll look both ways, checking for vehicles before safely crossing the road. This is shown in the below gif, where the agent has moved to the crossing outside Burger Queen instead of just crossing the normal road outside TGI Tuesdays, even though they technically could cross there..
Living World
Once all of these aspects have come together, we have a living world! It is at this point where you can sit back and watch the citizens of the world go about their lives. You can click on any pedestrian or vehicle to see who they are and where they’re going.
One bonus feature that my project manager had wanted added was to provide events for the agents to fufill. To meet with this, I added an easter egg hunt event, where a bunch of special agents will spawn and have to search the world for easter eggs hidden in shops. This led to me adding a few new features; firstly, a system which allows for “scenarios” to be added very easily to the project using a rudimentary API, and secondly a chat system so the agents can tell the observer (and eachother) what they’ve found. There are a few variations of the Egg Hunter scenario, where agents may work together or against one another, or in some cases even observe one another and act accordingly. In this example below, the agents are running with an “Optimised Free Search” algorithm. In this version, all agents are working together to find as many eggs as possible, and won’t double check any shops. After checking a shop, they’ll look at the list of remaining shops and go to the closest one to them.
Links
Citizens was created as the core element of my final year development project at De Montfort University. You can download the project to run yourself or browse the source code below:
Project Download: https://drive.google.com/file/d/1WfqP08bFpKZaQD5c00XFhOZK30sKhRtk/view?usp=sharing
Project Source Code: https://github.com/Fureniku/Citizens/tree/RC4 (built with Unity 2020.3.12f1)
Project Report (including all research and a more detailed overview of some mechanics): https://drive.google.com/file/d/1y9G4_pe3lqr4CotyKAX-j_vaKq8LZYHC/view?usp=sharing